In this guide we will discuss the different materials and construction techniques one can find in the enormous smorgasboard (or rather minefield) of sheds on the market today. We will also point out some of the hidden costs and potential pitfalls lurking beneath many of the beautifully dressed up hovels your hard earned money can buy. Let’s dive right into it.
1. Is the floor included?
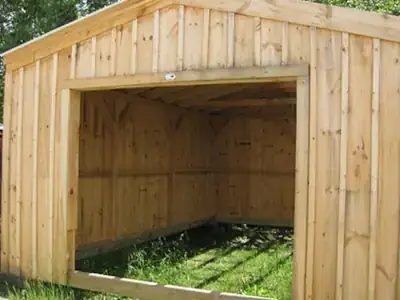
shed without a floor
No, this is not a joke. One of our customers recently told us that it was only the moment the flatpack white elephant was delivered that he discovered that the shed he had bought from a “reputable” retailer did not include a floor. Many people assume that a shed always includes a floor, especially when the glossy magazines always show a pretty looking shed with a floor. As the saying goes, assumption is the mother of all error. Some retailers supply the floor only as an “optional extra” or an “accessory”. It pays to ask before clinking the deal.
On a positive note, at least the roof seems to be pretty standard 😄
2. How sturdy is the subfloor?
The subfloor is anything that goes underneath the floor and that you normally would not see, unless and until you get down on your knees and stick your head underneath the shed (if there is room for it). But hidden from sight does not mean it’s not important, on the contrary.
The subfloor is what keeps your floor and anything else above the floor (walls and roof) straight and level. It’s the foundation of the building. If the foundation is flimsy, the whole shed will sooner or later sag and warp, causing not only an eyesore but it will also compromise the weather tightness of the whole shed. I’m sure you get the picture.
example of a poor subfloor
In the picture on the left is an example of what I would consider a poor subfloor. Notice how the subfloor is made up of 100x50 timber running the length of the shed. They are what we would call the floor joists. But there is no structural timber tying those floor joists together, and there are no bearers that the floor joists can rest on. The only thing that ties the floor joists together is the floor boards on top, and those are not considered structural. Also, the floor joists rest directly on the ground, which means that your ground better be absolutely flat and stable (like concrete), otherwise your shed will (sooner rather than later) warp, crack and crumble.
There are other potential problems with this subfloor, like the uneven spacing and the treatment of the timber, but we’ll get to that further on.
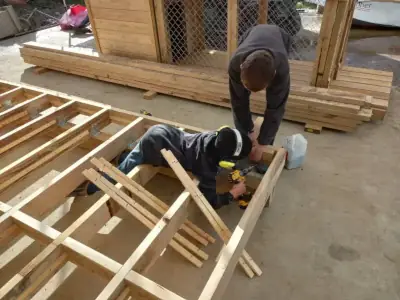
a solid subfloor under construction
Here’s how we construct the subfloor of our Tom Good garden shed, which is about the same size as the above mentioned shed and which we sell for a very similar price. We start by putting down two sturdy bearers, which are made of either 100x100mm H4 treated timber or 150x100mm H4 treated timber for the 4.8m version of this garden shed. On top of those we put 140x45mm H3 treated floor joists at 400mm spacings. This is the same standard used in the residential building industry and can support a herd of elephants doing the Lambada.
For smaller sheds or where ground clearance needs to be kept to a minimum we may occasionally combine bearers and joist, like in our Pigeon Perfect sheds, but we always make sure the timber is sturdy, ground treated and tied together to make one integral structure in both dimensions.
3. Is the timber used in the subfloor ground treated?
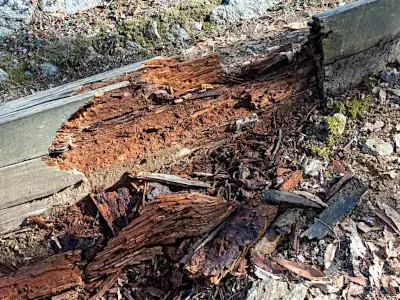
rotting timber in contact with the ground
Wood that is exposed to moisture (rain, condensation, air humidity, ground moisture, etc..) will rot. For some species like cedar and macrocarpa that may take many years, for others it only takes a few months. Pine, which is the main wood species used in New Zealand’s building industry, will rot in a matter of months, unless it is properly treated.
Different levels of exposure require different levels of protection. For any timber that is in contact with the ground, the treatment level required for adequate protection is H4. So, unless you plan to raise your shed off the ground, it is absolutely necessary that the bearers (or the joists if there are no bearers, as in the above mentioned shed) are H4 treated.
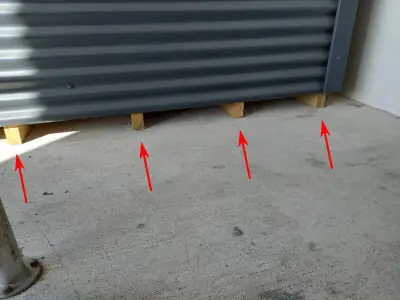
Be warned, as it is not uncommon to see some shed builders in New Zealand use only H3 timber for their subfloor. Which means that you, the customer, will need to make sure the shed is raised off the ground. This can be achieved by putting the shed on bearers, H4 blocks or concrete pavers. Although this is not ideal, as ground moisture may still creep up and keep the timbers in your shed permanently wet, leading to premature rot.
But why would you need to “fix” a problem that can (and should) be easily avoided by the manufacturer? The simple solution to avoid rot in your subfloor is to use properly treated timber, which is H4 for the bearers and at least H3 for the floor joists.
4. Is the floor of the shed sturdy enough to support the weight of its contents?
Having a sturdy foundation is a good start, but certainly not the end of the story. A solid shed also needs a solid floor, i.e. what goes on top of the floor joists. For timber sheds, this usually consist in either individual floorboards stacked together or plywood. The further the distance between the floor joists underneath the floor, and the heavier the weight that the floor is meant to support, the stronger the floorboards or the plywood needs to be.
For example, according to the New Zealand building code (NZS 3604:2011), if your floor joists are spaced 400mm apart, your plywood needs to be at least 15mm thick (we use at least 17 or 18mm), whereas for joist spacings of 600 mm you need at least 19mm thick plywood.
We have seen sheds on the market with only 12mm plywood for a floor, which is absolutly inadequte for anything larger than a dog kennel or anything heavier than a couple of rabbits. So, unless you’re planning to forever keep your shed in a china cabinet, you’d better make sure the floor is going to be able to support your mother-in-law and whatever else you plan to store in it, otherwise your shed floor will soon resemble an 18 hole golf course!
5. Is the floor of the shed treated?
While technically it is acceptable to use untreated timber for a residential floor, we believe it is not acceptable for something like a garden shed. Why?
First, while it is true that the building code does allow untreated floor boards in residential buildings, it does not allow this in wet areas like the bathroom. In those areas treated floorboards are required to comply with the building code.
Second, more often than not the shed will be much lower to the ground than a code compliant timber floored house, which means the floor will have a greater exposure to ground moisture coming up from underneath the shed.
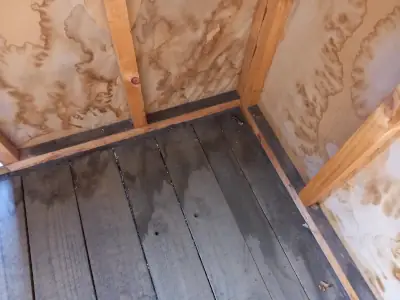
moisture inside a new garden shed
And most importantly, with a garden shed there is also a serious possibility (almost unavoidable) of moisture coming from the inside of the shed, through wet tools, muddy boots, liquid spills, condensation, etc. This is more so the case when the shed is not very weather tight, as in the photo on the left. This photo shows a brand new shed, a display model, a shed that has never been in use; it only sat in a parking lot for a few weeks. Notice the stains on the building paper? Notice the floor in the corner being soaking wet? We think this particular garden shed ought to be called the “Garden Sieve”.
To avoid any of these problems and to give our customers good and lasting value, we decided to only use H3 treated plywood for our floors. Sure, it costs us a few extra dollars, but we prefer to compete on quality rather than on price — even though we believe our prices are very competitive anyway, regardless of the extra quality that’s stock standard on all our products.
6. What dimension is the framing timber?

adequate stud size and spacing
The framing is what the basic structure of the shed is made of, and what holds up the wall cladding and the roof. It’s the skeleton of the shed. Just like a strong man needs strong and healthy bones to keep his whole body up and to give his muscles something firm to attach to, likewise a solid shed needs a sturdy frame to keep up the roof and to attach the cladding to.
It is amazing to see how many sheds there are on the market today that use 45x45mm framing timber, even for fairly large sheds. An average grown man is able to break this kind of timber with his bare hands. So why do people use it for framing a shed? Simple.. because it’s cheaper.
For any shed larger than a dog kennel or a small chicken coop, we always use at least 90x45mm (or similar, like 140x32mm) framing timber, the same as what has been used for donkeys years in our homes (good old “four by two,” or “two by four” for the yankees among us). You can see some good examples of sturdy framing in our Tom Good sheds.
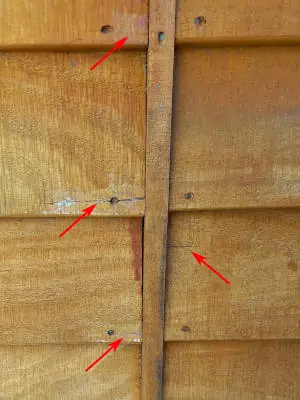
7. How far apart are the studs?
flimsy studs too far apart
Not only do some cheapskates out there use 45x45mm framing timber, on top of that they space them so far apart that you’d need a treasure map just to find a place to hang a picture! Placing studs at 600mm intervals is pretty standard in the building industry, but apparently not so standard once you start looking at the generous range of garden sheds out there, including those from “reputable” retailers and big box stores.
Have a look at some of the supposedly “tough” sheds out there. Do a quick Google search or check out the assembly videos on youtube, and you’ll see what we mean. Some studs, even the flimsy 45x45mm toothpicks or the 75x45mm heavy duty chopsticks, are spaced at 1 to 2 meter spacings, while the sheds are advertised as having a “full timber frame for strength and easy fixing of tools, shelves, wall linings, etc.” The shed pictured on the left for example has only one internal stud for a wall spanning well over 2m!
At Supa Sheds, we like to be different. As well as using sturdy 90x45mm framing timber, we also space our studs at maximum 600mm intervals. We would just love to compete with any of the white elephant builders out there in a “tool fixing and shelves hanging contest.”
8. To what level has the framing timber been treated?
The same reason why you need to use sufficiently treated timber in the subfloor and the floor applies here, although to a slightly lesser extent. According to the building code, framing timber in residential buildings needs to be at least H1.2 treatment. If the exterior cladding is perfectly weathertight (as is the case of a well constructed house), and condensation and spills on the inside are kept to a minimum, one could possibly get away with H1.2 treated timber in a garden shed.
But to be safe, and especially if the cladding and flashings are not as weathertight as the average timber framed house (as seems to be the case in all too many garden sheds on the market today), we recommend shopping around for a shed that uses H3 framing timber. With this level of treatment there is no way the timber will ever rot under normal conditions. You’ll sleep much better!
9. What quality building paper is being used?
Building paper is often used as a secondary line of defense against moisture entering the building. But not all building papers are of the same quality, and not all building papers are applied correctly.
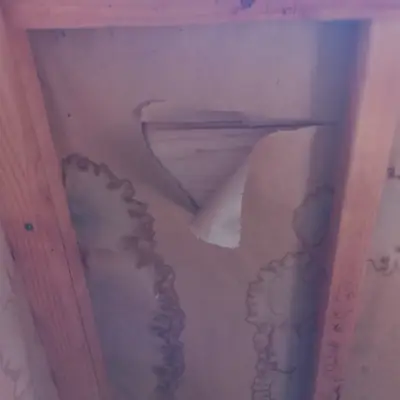
ripped building paper
Take for example the building paper used in the above mentioned “Garden Sieve” and shown here in the photo on the left. It is of the lowest possible quality, as it soaks up water and it rips as easy as cheap, 1-ply toilet paper. There are much better alternatives than the old fashioned paper we used long ago for wrapping up Christmas presents!
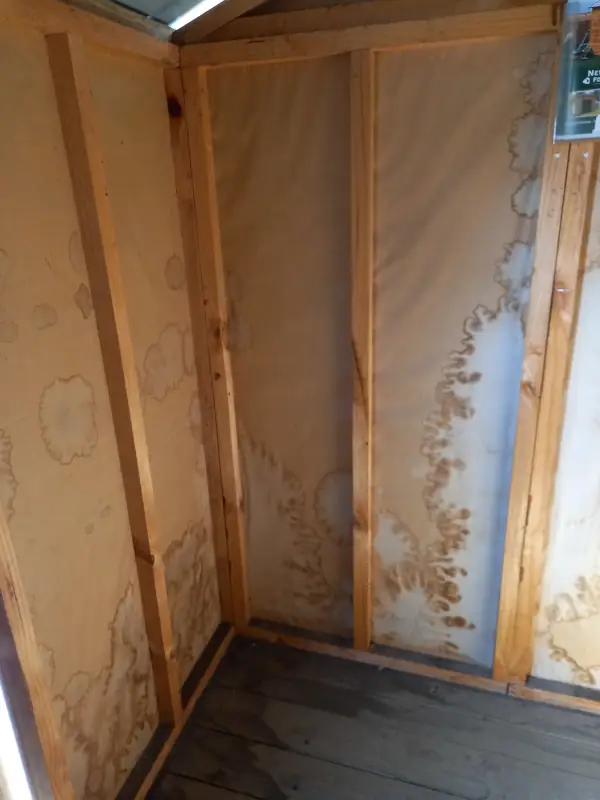
moisture seeping through joins
The building paper we use at Supa Sheds is a top of the line breathable, fire retardant, BRANZ appraised, flexible wall underlay. It allows water vapour to pass through from the inside of the wall whilst water from the exterior is kept out. Sure, it is more expensive than the budget present wrapping paper, but it does what it is supposed to do, which is to keep moisture out! You can see some examples of good quality building paper on our Tom Good and Pigeon Perfect sheds.
Then there’s also the way the paper is applied. Check out the photo of the inside of the “Garden Sieve” shown here on the right. Notice how the moisture seems to have come from the central, double stud on the right of the photo? That’s quite likely because this shed comes as a kitset, which means the walls are made up of separate, pre-manufactured panels, which are often pre-wrapped in building paper. So wherever the panels join together, the building paper does not overlap, like it should do according to manufacturers instructions and best pratices. The result? Water gets in as easy as gossip at a family reunion.
This kitset related problem is one of the many reasons we normally do not supply our sheds in kitset form, but only as fully assembled sheds.
10. Is there enough timber in the roof to avoid sagging?

purlin span too large
Another problem we often see in popular garden sheds out there is that there is not enough timber in the roof to keep the roof where it should be (up there) and in the shape it’s supposed to be (straight). For example, in the picture on the left we see a shed that is being advertised as being “tough.” Yeah right!
According to the building code (NZS 3604:2011) a 140x45mm purlin (which is what they used here) on it’s edge and at a spacing of 1200mm apart (the shed is about 2.5m deep and only has one purlin) can span a maximum of 1.8m. They spanned the whole 3.9m length of the shed with one purlin, more than twice what the building code states as the limit!
Sure, stricly speaking, these sheds may or may not fall under the building code, but the whole point is that every piece of timber has it’s limitations and if and when you go beyond those limitations, the piece of timber will sag and possibly even break, regardless of whether it’s legal to ignore the laws of gravity or not.
In comparison, check out how much timber goes into the roof of our sheds. For example, our Tom Good garden shed has two 140x45mm rafters and four 90x45 purlins, spanning an area that’s 2.4m deep and 3.6m long. That’s about 0.1㎥ of timber in the roof of our garden shed, as opposed to 0.025㎥ of timber in the roof of that “Tough” garden shed. That’s four times more roofing timber in a shed that is smaller, let alone all the other factors one has to consider, like fasteners and anchoring.
11. Is the outside cladding strong and durable?
splitting in cladding that is too thin
The outside cladding is your first line of defense against not only the weather, but also against bumps and scrapes from anything out there that moves, including people, livestock, lawnmowers, vehicles, bikes and kids’ toys. This is where we believe timber cladding takes the lead over and above metal cladding. Not only does timber look much better, it is also much more forgiving with rough handling and it does not so easily dent like metal does. Once you dent a metal shed, good luck trying to hide it! If you kick a hole in a wooden shed it’s not too hard to patch it up and paint it over.
But not all timber cladding is equally great or even suitable, far from it. Take a look for example at the now famous “Garden Sieve” mentioned above, with it’s beautiful, stained weatherboards. What the glossy brochure doesn’t tell you though is that the “weatherboards” are only about 10mm thick. And when you have a closer look, you’ll see that this could be a problem. There are splits and cracks all over the show, leading to open borders for water and pests, and possibly even boards falling off when the kids try out their new subwoofer.
What’s the simple solution? Use something that is a little thicker (like the standard 18mm weatherboards), or something like good old plywood, which, even though it can be just as thin (12mm), it has far greater strength due to having multiple cross laminated veneers. You’ll have trouble (and a sore foot) kicking a hole in a piece of 12mm plywood!
Another problem we see in this picture is that, because the studs are so narrow and sparingly spaced, the weatherboards need to be nailed very close to the end of the board, which makes the problem so much worse again. One problem exacerbating another! One way to minimise this problem is to predrill the nail and screw holes, but that may be too much hassle for the cheapskates out there..
12. Are the joins in the cladding adequately protected by flashing?
Following from the previous point, remember the water seeping through the wall join we mentioned before, where the building paper does not overlap the join? The picture in the previous point was taken exactly at the same spot, but from the outside. And even though the weatheboards look like they are nicely butted up against the middle join, there is no flashing to cover the join, which means water will have no problem getting in, especially not if or when the timber dries, moves, shrinks and cracks, as timber is prone to do.
The same problem is present at all four corners of this particular shed in question, as well as everywhere else one wall panel is joined to another panel. Don’t think we’re nit picking here, as this poor construction technique is more common than you think, and the results speak for themselves: water stains all over the walls (on the inside) and floor of a shed that’s only been in the weather for a few weeks. Who would want that?
The solution in this case is to cover all joins with a suitable flashing, as you’ll see us do for example in the Friar Tack shed.
13. How sturdy and durable is the door?
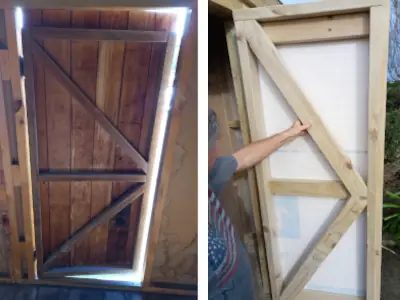
door construction comparison
If you’ve made it this far through this guide, you are probably getting the hang of it. For example, in the picture on the right, compare the door on the left, which is part and parcel of the now infamous “Garden Sieve,” with the door on the right, which is one we make for our Pigeon Perfect sheds. Can you spot the difference?
But here is something you may not be able to spot so easily. Our Margo A shed has a roller door that is made in New Zealand, using New Zealand steel. They are not cheap, but well worth the extra cost over one of those cheap imports from China. The advantages are plenty, including a 10 year warranty against perforation, no risk of delaminations compared to double skinned doors, no risk of panel bow due to heat which occurs on double skin panels, thicker steel compared to the cheap imports, no harmful chemicals being used, much better UV protection, etc.
So beware, at least one of our competitors out there is taking shortcuts by using cheap, imported roller doors, even though their sheds sell for about the same price as ours. And that’s on top of several other shortcuts they take.
14. What’s the overall workmanship like?
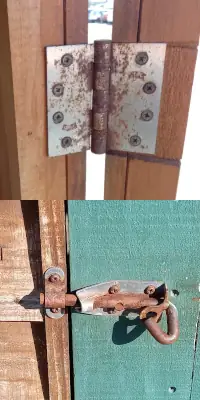
rusty hardware
A good and honest builder takes pride in his work and will pay attention to detail. It’s often these details that will tell you whether the person or company that built your shed was aiming for speed (and profit) or quality (and happy customers).
-
Are the nails or screws spaced evenly, at consistent depths and at regular intervals, or are they all over the place, inconsistent, possibly too few and far between?
-
Are the cuts in the timber square, or are there big and uneven gaps in the joins?
-
If you decide to buy a kitset, make sure all components are fresh and straight. Timber has a tendency to warp and bend unless it is properly constrained, so it is not uncommon for loose pieces of timber to go bananas when left out in the sun for too long.
-
Are the fasteners and other hardware like door hinges, latches and door handles galvanised? It’s no fun to find out a few weeks after you bought a shed that all the hardware has gone rusty, like in the photo on the right. A good builder will try and use good materials.
-
Are the nails flush with the surface, or are they too deep? This often happens when builders use nailguns that are not properly adjusted. It doesn’t look great, especially when it happens in the cladding, and it’s an invitation for water and pests to penetrate and attack the timber.
Conclusion
Not everything that glitters is gold!
It pays to know what to look out for when you’re shopping for a garden shed. A lot of costly disappointments can be avoided by watching before you leap, by asking the right questions and by not letting yourself be deceived by glossy magazines and slick marketing lingo.
Most of all this is common sense, however, given the enormous amount of junk on the market today, and considering the enormous market share these white elephants seem to enjoy, common sense can no longer be considered as common as it once used to be 😄


